
Tell Don't Ask

Tell-Don't-Ask is a principle that helps people remember that object-orientation is about bundling data with the functions that operate on that data. It reminds us that rather than asking an object for data and acting on that data, we should instead tell an object what to do. This encourages to move behavior into an object to go with the data.

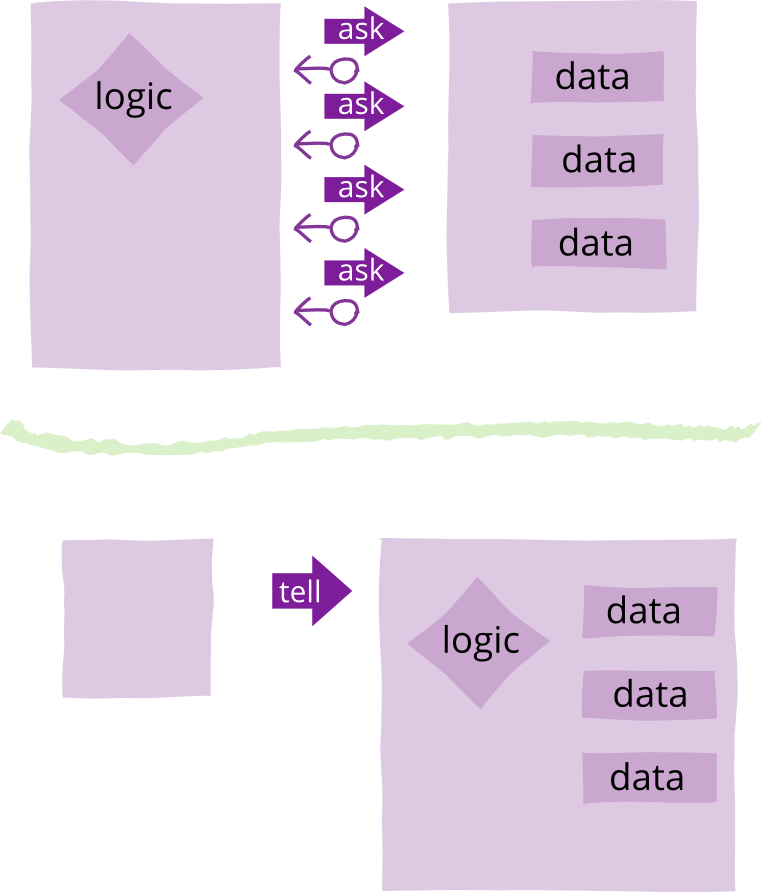
Let's clarify with an example. Let's imagine we need to monitor certain values, signaling an alarm should the value rise above a certain limit. If we write this in an "ask" style, we might have a data structure to represent these things…

class AskMonitor...

  private int value;
  private int limit;
  private boolean isTooHigh;
  private String name;
  private Alarm alarm;

  public AskMonitor (String name, int limit, Alarm alarm) {
    this.name = name;
    this.limit = limit;
    this.alarm = alarm;
  }

…and combine this with some accessors to get at this data

class AskMonitor...

  public int getValue() {return value;}
  public void setValue(int arg) {value = arg;}
  public int getLimit() {return limit;}
  public String getName()  {return name;}
  public Alarm getAlarm() {return alarm;}

We would then use the data structure like this

AskMonitor am = new AskMonitor("Time Vortex Hocus", 2, alarm);
am.setValue(3);
if (am.getValue() > am.getLimit()) 
  am.getAlarm().warn(am.getName() + " too high");

"Tell Don't Ask" reminds us to instead put the behavior inside the monitor object itself (using the same fields).

class TellMonitor...

  public void setValue(int arg) {
    value = arg;
    if (value > limit) alarm.warn(name + " too high");
  }

Which would be used like this

TellMonitor tm = new TellMonitor("Time Vortex Hocus", 2, alarm);
tm.setValue(3);

Many people find tell-don't-ask to be a useful principle. One of the fundamental principles of object-oriented design is to combine data and behavior, so that the basic elements of our system (objects) combine both together. This is often a good thing because this data and the behavior that manipulates them are tightly coupled: changes in one cause changes in the other, understanding one helps you understand the other. Things that are tightly coupled should be in the same component. Thinking of tell-don't-ask is a way to help programmers to see how they can increase this co-location.

Comments

Popular posts from this blog

6 Rules of Thumb for MongoDB Schema Design

“I have lots of experience with SQL and normalized databases, but I’m just a beginner with MongoDB. How do I model a one-to-N relationship?” This is one of the more common questions I get from users attending MongoDB office hours. I don’t have a short answer to this question, because there isn’t just one way, there’s a whole rainbow’s worth of ways. MongoDB has a rich and nuanced vocabulary for expressing what, in SQL, gets flattened into the term “One-to-N.” Let me take you on a tour of your choices in modeling One-to-N relationships. There’s so much to talk about here, In this post, I’ll talk about the three basic ways to model One-to-N relationships. I’ll also cover more sophisticated schema designs, including denormalization and two-way referencing. And I’ll review the entire rainbow of choices, and give you some suggestions for choosing among the thousands (really, thousands) of choices that you may consider when modeling a single One-to-N relationship. Jump the end of the post ...

How to add your Conda environment to your jupyter notebook in just 4 steps

 In this article I am going to detail the steps, to add the Conda environment to your Jupyter notebook. Step 1: Create a Conda environment. conda create --name firstEnv once you have created the environment you will see, output after you create your environment. Step 2: Activate the environment using the command as shown in the console. After you activate it, you can install any package you need in this environment. For example, I am going to install Tensorflow in this environment. The command to do so, conda install -c conda-forge tensorflow Step 3: Now you have successfully installed Tensorflow. Congratulations!! Now comes the step to set this conda environment on your jupyter notebook, to do so please install ipykernel. conda install -c anaconda ipykernel After installing this, just type, python -m ipykernel install --user --name=firstEnv Using the above command, I will now have this conda environment in my Jupyter notebook. Step 4: Just check your Jupyter Notebook, to se...

Bet you didn’t know this about Airflow!

  We are living in the Airflow era. Almost all of us started our scheduling journey with cronjobs and the transition to a workflow scheduler like Airflow has given us better handling with complex inter-dependent pipelines, UI based scheduling, retry mechanism, alerts & what not! AWS also recently announced managed  airflow  workflows. These are truly exciting times and today, Airflow has really changed the scheduling landscape, with scheduling configuration as a code. Let’s dig deeper. Now, coming to a use case where I really dug down in airflow capabilities. For the below use case, all the references to  task  are for  airflow tasks . The Use case The above DAG consists of the following operations: Start an AWS EMR cluster : EMR is an AWS based big data environment. To understand the use case we don’t need to deep dive into how AWS EMR works. But if you want to, you can read more about it  here . Airflow task_id for this operation:  EMR_start...